Sunday, August 25, 2013

Guest Room Reveal

The guest room is finished and I'm super happy with the results! Hooray! The room ended up being a little more cottage-y than I originally thought, but that isn't a bad thing. I think it will be a lovely place for our guests to stay now. In fact, it will be housing my sister and her family who are coming for a visit today. I had so much fun getting the room all put together for them. As a reminder, here is the before:


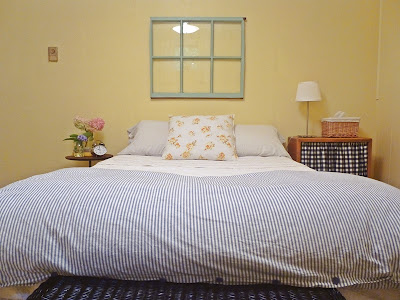
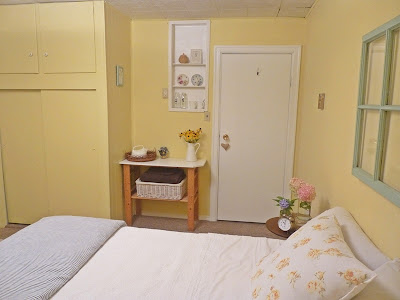
And here is the room now after new paint, some furniture makeovers and a little decorating (warning: there are a ton of photos)...


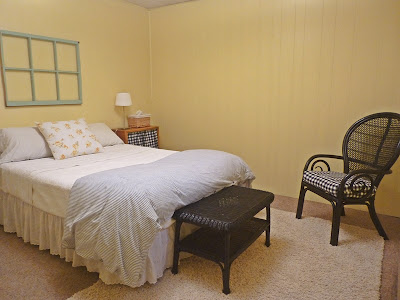
A little reading corner... there are magazines in the crate.


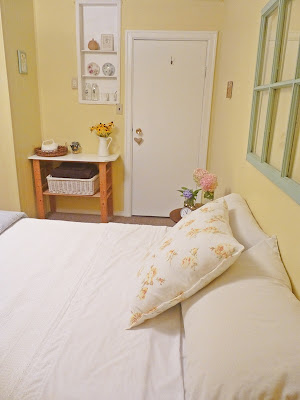
This is a little tea-making station. 
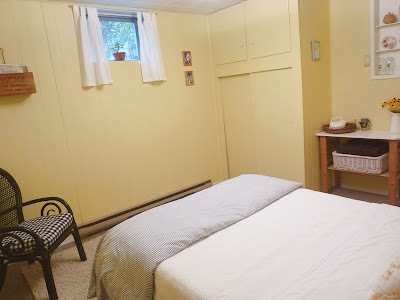
Here's a break down of what we did in the room. First we primed the paneled walls and then we did two coats of paint on all the walls. I gave the trim a fresh coat of white and I also painted the little built-in shelf white as well as the door and the trim around the door (the door and trim were previously the same blue as the walls). The chair and the wicker table at the end of the bed both got spray painted in a semi-gloss black. I recovered the cushion on the chair in a black and white gingham.  I stained the top of the little round side table and I stained the bookshelf to the left of the bed. I also used the same gingham fabric to sew a curtain for the bookshelf. I used some craft paint to change the window frame colour from blue to light green and I also painted a picture frame the same colour. I brought a lamp, the rug and some other accessories into the room from other parts of our house and I hung art on the wall. I added new hardware to the cupboard doors and I put a hook on the back of the door. Whew. I think that's pretty much it.

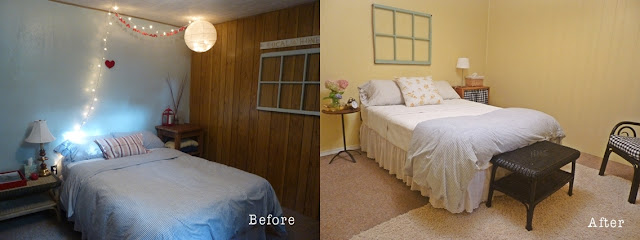
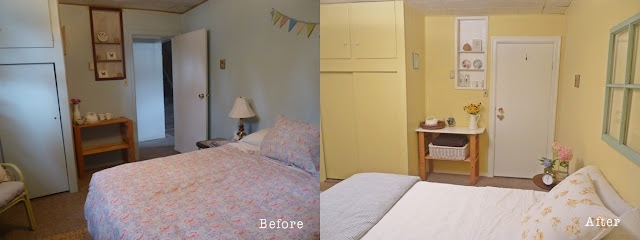
Here's some before and after, side-by-side action:


Most of the things for this room we already had. I just pulled items from around my house and made over some things. We spent about $100 on the makeover and half of that was on the two cans of paint we needed. Otherwise, the money was spent on some new hardware, spray paint for the furniture, an alarm clock and few other thrifted finds. It would have cost a little more, but my wonderful mother-in-law, Dee, bought me the fabric for the bookshelf and the chair. She's so lovely!

So, that about covers it. In another post I'll go into a little more detail about the furniture that I fixed up... this one is already way too long!

And on that note, I'm off to get some last minute things done before my sister arrives!

Tuesday, August 20, 2013

How Does your Garden Grow?

I thought it was about time I shared a garden update, though we're just going to look at the front veggie patch because that's really the only area that I focused on this year. The rest of our yard is rather weedy and a little dried out. Hopefully next year I'll be able to focus on making it prettier. We'll see! 

I'd say the vegetables have done pretty well! This was all an experiment for me and now I've got some good ideas for next year. My veggies and the flowers all grew huge and things were pretty crowded. I think I would space things out more next year and I'll also move some things around. As for flowers, I realized nearly all the colours were yellow or orange. I'd definitely like to see some more variety, maybe some pinks and purples in there! This year I have had marigolds and calendula throughout the vegetables and they grew so well. They are still flowering, but nearing the end of their days. There is a bit more colour in the part of the garden closest to the house with some snap dragons, amaranthus, some lilies, and a white hydrangea. I've also got some black-eyed susans that I planted this year and love, but it's more yellow! 


I'm loving our Giant Russian sunflowers. They've been pretty happy and they are so lovely to look at through the windows. I'll be growing them again next year, but I'll also try some other varieties of sunflowers. 

Check out this huge cabbage!


I've really enjoyed eating from our garden. We've had radish, peas, beans, lettuce and we're still harvesting kale, tomatoes and carrots. I've also got a spud patch in the backyard that I've got to dig up soon. I love spuds!


Any preserving ideas for my tomatoes? I don't think we can eat them all fresh!

Did you grow any vegetables this year? How did it go?


Monday, August 19, 2013

Guest Room Progress

Progress is coming along nicely in the guest room. Walls have been painted, furniture made over, art is being assembled, lives are being changed. Okay, maybe I'm over-estimating the significance of this room makeover a wee bit. ;) Regardless, I'm quite happy with how everything is coming together. We've got a little over a week before my sister, brother in law, and little nephew arrive and I think its leaving me just the right amount of time to do the last projects on my list.


I don't want to show you too much yet because I want to keep it a surprise, but I'll show you the room with a coat of primer. First, here is the before again...


And here it is primed...


I'm amazed by how much brighter the room is with the paneling painted. And you should see it with the finished paint job. It looks like an entirely different space. It's so much cozier and less basement-like.

There's actually a story about the paint. We did the first coat and I realized I would need more for the second, but I wasn't happy with my 20 percent lighter formula of the 'Custard' colour. It looked a lot lighter and more like a cream than a yellow. Well, it turns out that the formula was off in the computer. So, when I went back to get more we did a colour match instead and got an excellent match to 'Custard'. Because the first colour (the 20% lighter one) was fairly similar, I hoped we would get away with doing one coat of the 'Custard' with some touch ups. It turns out that the coverage was great, so I got the colour I really wanted without having to spend extra since I needed a second can anyway.

Here's one more picture that shows you what the lighter colour looked like.


On the agenda today is getting hardware for the cupboards/closet and working on art for the space. Pretty easy work. I'm so glad there's no more painting!

Friday, August 16, 2013

Gingham Curtains

When we first moved into our house and started to unpack, I came across one lonely Ikea tab top curtain. I had even pairs for all the rooms, but was missing the second curtain for my dining area. It took me a while to remember that some time ago my mom and I shared a pack of drapes because we each only needed one for a project (this was a few houses back). Now knowing that I didn't have the second curtain, I decided to cut the single one in half, to have at least the illusion of drapes in the dining room. They weren't wide enough to cover the whole window, but they looked nice.


My makeshift curtains remained until the spring when my awesome mother in law, Dee, bought me some gorgeous, grey gingham fabric to make new curtains. My sister was the first one to turn me on to liking gingham, but I was also inspired by the gingham curtains in this beautiful home. In fact, I pretty much love everything about her home, but all the gingham especially! 


We ordered the fabric from Etsy and I eagerly anticipated its arrival. When it did show up, I set to work and sewed myself a very simple pair of curtains. Here are those bad boys in action...


We can actually cover our windows now. Hooray for privacy! It's also nice to add a little pattern to our kitchen. 


Oh, little kitchen you've come a long way. Remember how it looked in the beginning?

Whew!!

Have you done any sewing projects lately?

P.S. We've got the guest room walls primed. Pictures soon!

Thursday, August 15, 2013

Guest Bedroom

Since moving in to our house (a year ago now!!) we haven't touched the basement, which includes a rec room, our guest room and a workshop/storage room. There is furniture down there and I have decorated the guest room a bit, but what it really needs is paint! Since Patrick has the summers off, I figured this would be an ideal time to get some work done downstairs. Plus, my sister and her family are coming for a visit at the end of the month and I'd love to be able to have the room all done for her! I'm just so excited to have her visit our house for the first time.

Here is our guest room currently...


There it is, complete with sweet wood paneling. I actually really like the look of painted paneling (like in our bedroom), so although it is a bit of a nuisance to paint, in the end it will be good. 

I'd like to lighten the whole room up and I'm really just working with what I have (I might bring a couple of new things in). I'll be painting some pieces and maybe creating some new art for the room. I'll gradually collect new things for the room, but for this first step I'm using what I have.

Looking for inspiration for the guest room I started flipping through some of my old magazines and I came across this beautiful space:

http://houseandhome.com/design/after-guest-room
I love the colour, the fun floral and the contrasts in the room. The wall colour is called 'Custard' by Martha Stewart Living, so I decided to go with it, but I had it mixed 20 percent lighter because the downstairs room is quite dark with only one smaller window. For bedding, I'll be using a white quilt I have along with some white sheets and I'm going to also have a blue striped duvet from Ikea (previously in our bedroom).
I already have some vintage, floral pillow cases I found at our thrift shop that I'll use to bring in some extra interest and also to incorporate the yellows and blues.

I'm really digging the black head and foot boards of the bed, so I'd like to bring that contrast in by painting a wicker table black (you can see it by the bed in the photos above). I'll move this table to the end of the bed to hold luggage or extra blankets. I'm going to also paint a chair I have for the space black. I'll recover the cushion on the chair in a black and white gingham. The chair looks similar to this...


http://trianglehoneymoon.com/2012/01/18/the-rihanna-of-chairs/
There are other little updates I'll be doing, but I'll keep you posted on those along the way. I've already started painting the trim in the room, so I'm going to keep at it and I'll hopefully get to priming the paneling later today or tomorrow. I don't have much time before my sister arrives! Wish me luck!

Monday, August 12, 2013

Kitchen Continued

The last time I blogged about the kitchen I told you about how we took the upper cabinets down and were in the process of turning them into a sort of sideboard for our dining area. Today I'll continue the saga that may very well be the longest drawn out kitchen update ever!!! So, without further ado, here I go...

Once we had the cabinets down and in place just underneath our built-in shelf, we needed to add a top. Since the top of the cabinets had been adhered to the bulkhead over the counter, the top was raw wood, but in pretty good condition. We paid a visit to our local building supply shop and found some inexpensive birch shelving that we thought would work very well for the job. We had it cut to size there and brought it home.


I gave the whole thing a light sand (a little more on the edges) and then applied a stain. I still have yet to do a top coat, but I'll get to that one day! :)


Once I had completed two coats of stain I need to adhere the top to the cabinets. Since both pieces were raw wood I was able to use a wood glue. Admittedly, I think it could be sturdier, but it works for now and we really just use the top of the 'sideboard' for displaying things/storing a few kitchen items. 


Once we had the top stuck down, the next big step was painting the wall and bulkhead where the cabinets used to be. It really took us a while to get on that, but once we did, as you can imagine, the difference was huge!


Better, no? We weren't done here, though. I wanted to add some open shelves to the now empty space where the cabinets used to be. We bought some brackets from the hardware store and cut some leftover wood from the top of the sideboard to use for shelves. After giving the wood a coat of primer and then white paint (the same white from painting our cabinets) we were ready to install them. Lucky for us, we're pretty sure there is plywood beneath all our drywall because anywhere we have to anchor something to the wall, we hit a 'stud', or more likely the plywood. This makes things a lot easier because we don't need to use drywall anchors. Here are the open shelves all up on the walls...


The colouring is a little funky in this one... :S


I love the open shelves, they are the perfect spot for me to display some of my favourite dishes and jars. Next time, I'll show you a few other little updates I've done, like some new curtains I sewed. The kitchen is probably the most completed room in our house now and I'm quite happy with it!

Related Posts Plugin for WordPress, Blogger...