Friday, November 26, 2010

Christmas Stripes Cushion Tutorial

I recently purchased the November copy of Canadian House & Home and in this edition they feature a country home that belongs to designer, Sarah Richardson. The house is beautiful, it is so comfortable and warm. You can read the article and see the photos here. While looking through these images I noticed a cute pillow in the bottom corner of one of the photos.


I decided I would like to try and make a my own version of the cushion. However, I thought it would be hard to find a similar striped fabric, so the first thing I had to do was figure out how I was going to get the cute Christmas coloured stripes. After some brainstorming, I decided to buy a plain natural cotton and sew some green and red ribbons onto the fabric. So, here is my finished version and instructions on how I made my striped Christmas cushion...


First, you need to buy a plain natural fabric and some various coloured ribbons. I chose a couple of different greens, a rusty red and a golden brown. I also chose ribbons with different finishes to add texture. For example, two of my ribbons are velvet, one is ribbed and the other satin.


Once you have your materials you're ready to start sewing. The first step is measuring out your fabric to fit your cushion. My cushion insert was 16x24" so I measured my fabric to have just a couple of extra inches.


Next, measure out and cut your ribbons to be the length of your fabric. Once all your ribbons are cut arrange them on the front piece of your fabric in a layout that you like and then pin them in place.


Once you have arranged your ribbons and they are pinned, it is time to sew them to the fabric. Simply do a straight stitch along both sides of every ribbon. 


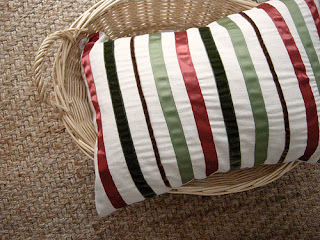
Once you have sewn all the ribbons it should look something like this...


The next step is pinning the front and back pieces together with the right sides facing in.


After you've pinned around the edges, you can sew around three sides. Make sure you leave one side open so you can insert the cushion.


Your cushion cover should look like this inside out...


The final step is to close the third side. First turn your cushion cover right side out and stick your cushion insert inside. Then, simply fold in the two bottom edges and pin them together (so the raw edges are folded inside). Unfortunately, I don't have a photo for this step. Onces the third edge is pinned, then you can either hand sew or use a machine to sew the final seam. And that is it! You are done and have a new Christmas cushion to decorate your home with!


This cushion is actually now for sale in my Etsy shop which you can visit here! Soon I will be putting up more cushions among other things!

Sunday, November 21, 2010

Giveaways Galore!

I would like take a moment to direct your attention to a wonderful giveaway from Cabbages and Roses at the following blogs...


If you haven't heard of Cabbages and Roses, you definitely should visit their website here and browse through their beautiful collections of fabrics and homewares. Here are some images from their site...


Beautiful, no? To have a chance to win some of this fabric, visit the above blogs and read about how you can enter each of their giveaways. And while we're on the subject of Cabbages and Roses, to see a tour of 'Brook Cottage', the countryside home of the woman behind Cabbages and Roses, click here.


Sigh. One can dream.

Citrus & Spice & Everything Nice

When I was little my Mom made these Christmas Ornaments that had cloves in them. Every year when we would decorate the tree, I could smell their spicy scent from inside the bucket filled with our homemade ornaments. Every time I smell cloves, I'm reminded of Christmas and all things cozy.


A few years ago I read in a magazine (probably a Martha Stewart Living) about an easy and cheap way to make your home smell delicious! All you have to do is cut a few slices of orange, take a couple of cinnamon sticks and a small handful of cloves and add them to boiling water. You can keep the water simmering and your house will gradually smell wonderfully like citrus and spice. This is one of my favourite things to do during the season and it makes my home feel so cozy. You really should try it!


Friday, November 19, 2010

Corners of our Cottage

On one of the blogs I enjoy reading, Homespun Living, the author will write posts she titles 'Corners of My Home'. I like her idea of showing just a 'corner' at a time, so I am going to do the same! Today, I am going to show you a corner of my living room which displays a new thrift store find.


On the coffee table sits my new basket that I found at the Salvation Army just the other day. I paid $2.50 for it and I love it. It is divided into 6 little squares, has two handles and is perfectly faded and worn.


Sitting next to the basket is a birch log with some tea lights. This was from our wedding. We had birch logs with tea lights on all the tables. They were made by my father-in-law, Neil! I love that the colour of the birch bark is the same grey as my new basket.


Here is the zoomed out view of this corner of my living room as it looks today. Next to the wooden chair in the second picture you can see my knitting basket waiting for me to finish several projects! Some of you may or may not know that I have an addiction to sewing cushion covers, so the ones on my couch are constantly changing. In fact, I've just sewn a cushion that is meant to be a subtle Christmas cushion, though it can be reversed to be not Christmas-y at all. It is the light beige cushion on the inside of the couch, but that is the non-Christmas side. This is the Christmas side...


I intend to leave it on the Christmas side as soon as I bring out the decorations... actually, I may just leave on the Christmas side now. It IS snowing afterall!

Well, that's it for this little corner of our cottage. Have you found any great pieces at a thrift store lately?

Sunday, November 14, 2010

Dressed Up Mason Jar

Sometimes our cottage gets very cold and it seems that no matter how many layers I put on I'll be chilly. So the other day, with my multiple socks, sweaters and pants on, I waddled over to the stove to make some tea for myself to speed up the heating process. As I was taking the tea bag out of the mason jar in which it was stored, I thought the jar looked a bit plain and could use some dressing up. I had just the thing- a piece of vintage-looking lace I bought a year ago and loved, but never used up. I got out my regular old white glue and the mason jar and set to work. Here is what I did:


Here is the mason jar before and the piece of lace. The first thing I did was simply measure and cut a piece of lace long enough to wrap around the lid of the jar.


Second, I put a line of glue all the way around the top of the jar and pressed the top of the lace to the glue.

And just like that, my jar looked little more special. It is fitting that the jar look pretty as I am going to be taking tea out of it a lot this winter. Brrrr.


Here is the pretty tea jar on its shelf in the kitchen, along with a couple of other jars. The bigger mason jar got a quick treatment of some burlap tied around the lid. However, this was silly of me because I'll have to take it off every time I want my rooibus tea. Oh, well!

Now, if you'll excuse me, I need to go add another layer to my outfit. Enjoy your Sunday! 

Have any of you added any special details around your house this week, perhaps in an attempt to make the winter months a little more enjoyable?

Friday, November 12, 2010

DIY Cross Stitch Art

One challenge I find is coming up with art for my walls. It can get pretty costly, so I am always looking for ways to make my own wall art. Recently, I came up with a fun way to create some free "cross stitch" art. I have seen a lot of cross stitch recently in various photos and I love the look.


So, using these pieces as inspiration, I decided to attempt my own version. Here is what I came up with...


This quote above hangs in my kitchen above my stove and the next one is over my couch in the living room.


It actually looks pretty cute and was super easy to make. First, I downloaded two free fonts. The first font is called 'Goodbye Crewel World' and can be found here. The second is 'Sjonarbok Classic' and you can download it here (if you need help downloading and installing the fonts just leave me a comment and I'll help you out). Next, I opened word processing and using the first font (Goodbye Crewel World), typed a quote I liked. To create the border around the quote I used the second font (Sjonarbok Classic). When in lowercase, the letters create a shape or pattern that can be repeated to create a border. For example, my border was made typing the letter 'c' over and over. 

Now that you have your quote, make sure that it is centered and aligned the way you like. If you have card stock or another type of nice paper print it out and you have your art. However, if all you have is plain white paper, you can try using this free 'Natural Linen- digital paper' from the Graphics Fairy. All you have to do is download the image and then print it full size. Next, simply print off your 'cross stitch' quote onto your 'natural linen' paper. This way, the page doesn't look quite as stark as the plain white.

Next, it is ready to be framed. If you are looking for a cheap way to frame it and you don't have a frame handy, check out a thrift store. Frames can always be updated with a quick coat of spray paint.  

And that is it! Quick and easy art for your walls! I think this would also look adorable in a kids room or a nursery.


Sometime, I'd like to do the actual cross stitching and create some fun designs, but this will do for now. I have too many projects that I need to complete before I can start something new. I can't believe how quickly Christmas is coming and I am so excited. I'll be coming up with some Christmas decoration tutorials soon, so keep checking back.  

Now, I must try and finish some of those projects. First up is completing my husbands cable knit scarf. I only have a little more to do and I can't wait to cross it off the list! 
Related Posts Plugin for WordPress, Blogger...